1、缓存使用
为了系统性能的提升,我们一般会将部分数据放入缓存中,加速访问。而db承担数据落盘工作。
哪些数据适合放入缓存中:
- 及时性、数据一致性要求不高的数据
- 访问量大且更新频率不高的数据(读多写少)
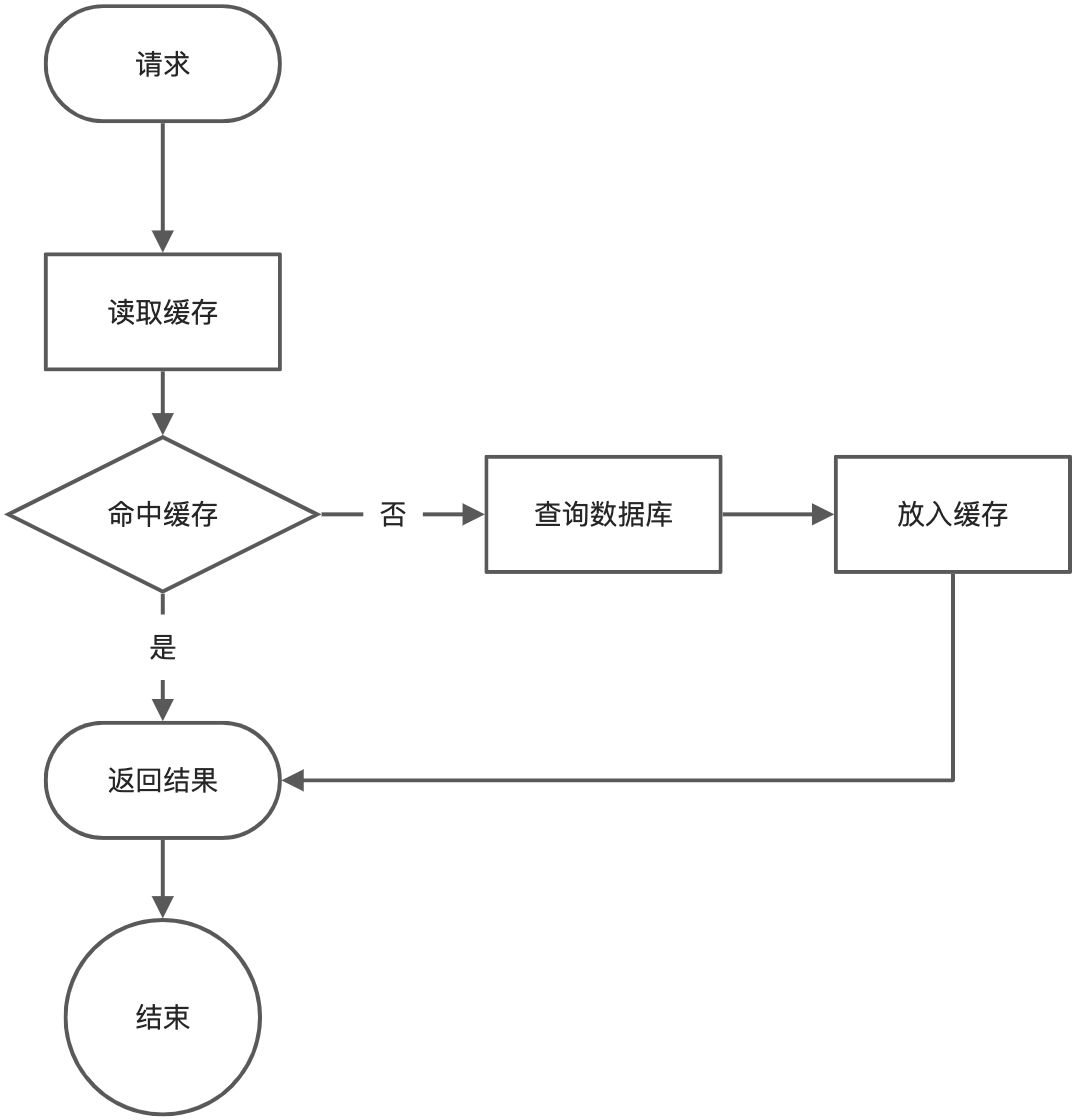
⚠️注意:在开发中,凡是放入缓存中的数据都应该指定过期时间。避免业务崩溃导致的数据永久不一致问题。
2、本地缓存
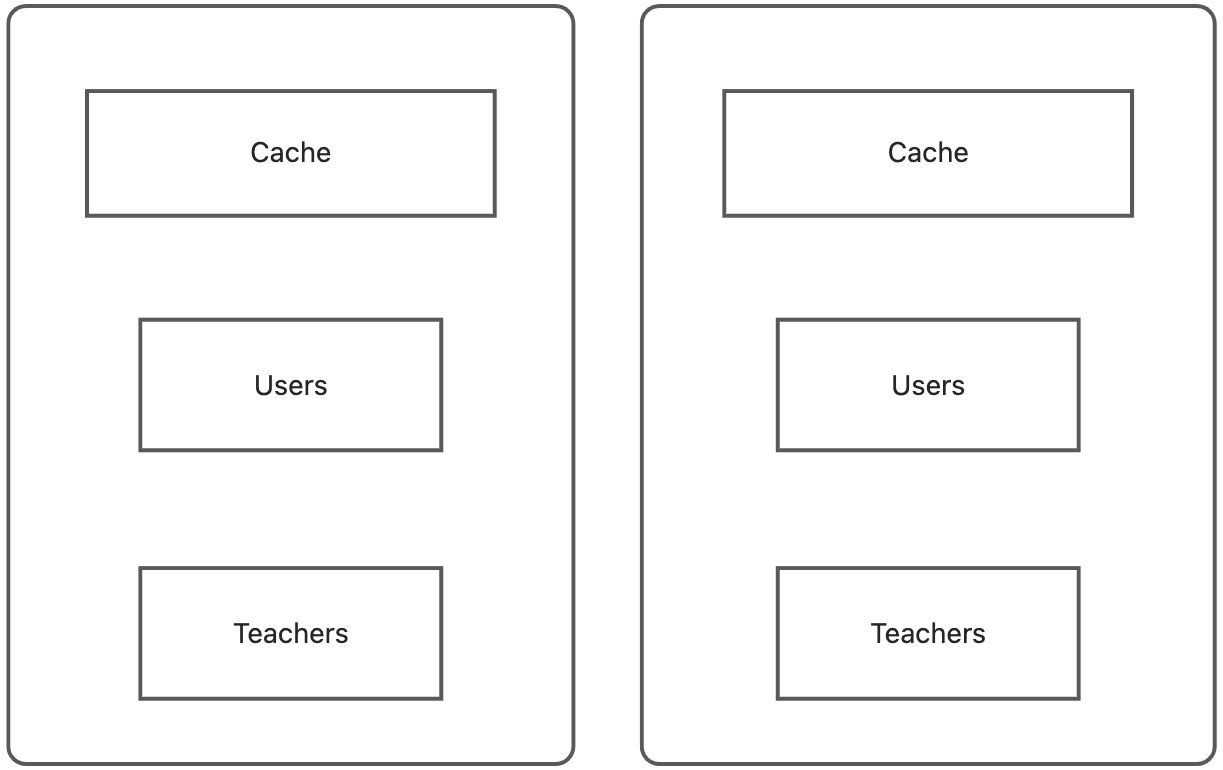
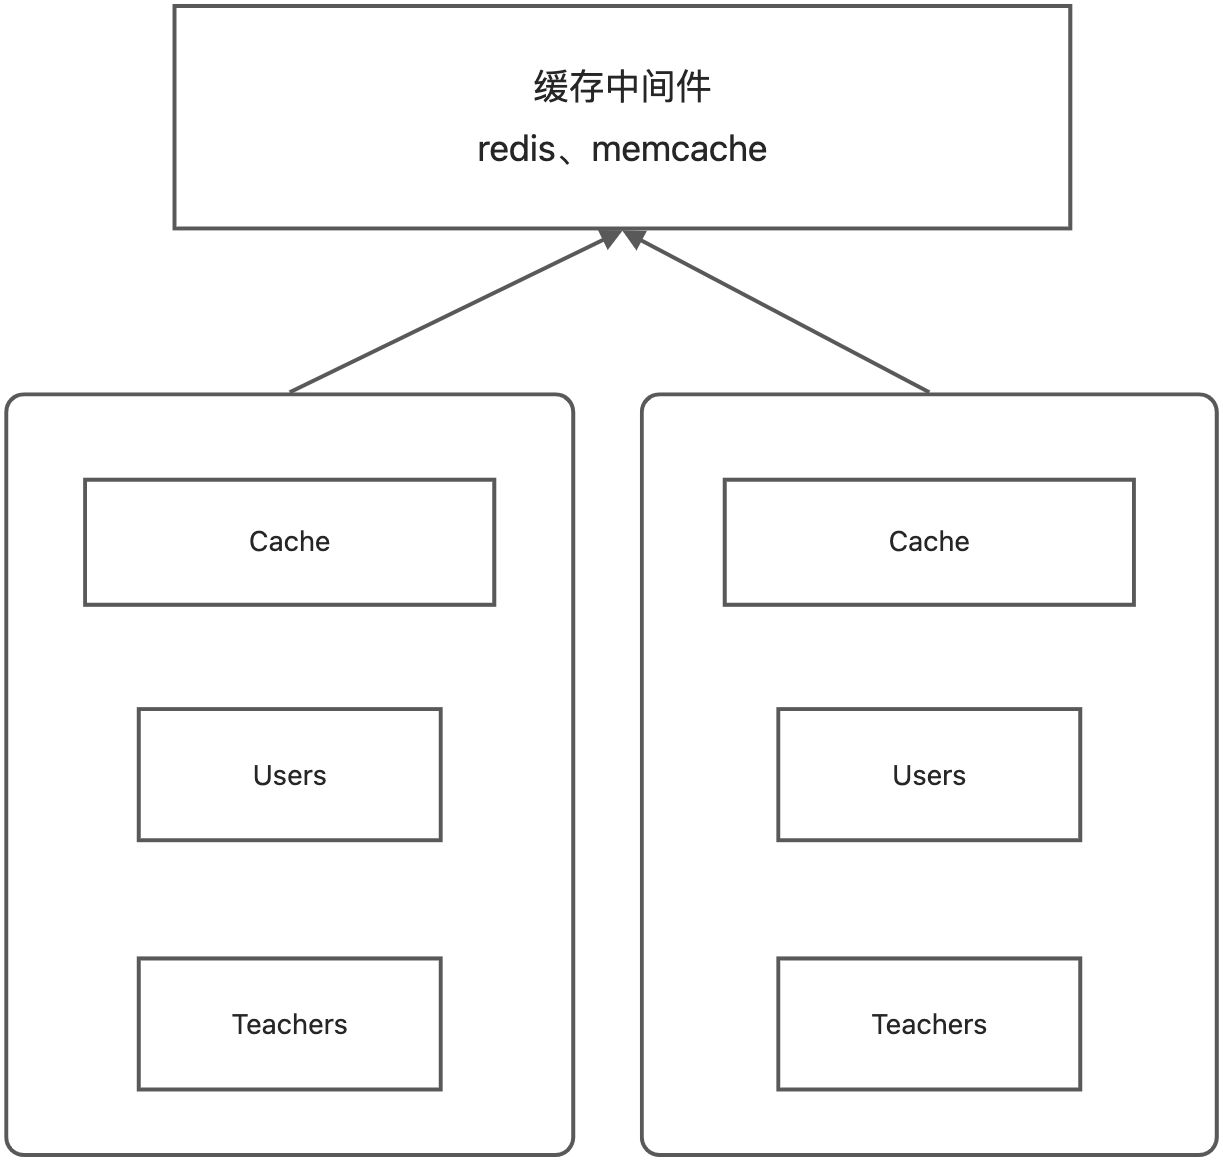
本地缓存就是使用Map来进行数据的存储。在单体应用中,使用本地缓存似乎问题不大。但是在分布式下,每个应用都会有自己的本地缓存,数据就极有可能不一致。
/**
 * @DESCRIPTION 本地缓存
 * @Author yaya
 * @DATE 2022/5/22
 */
public class LocalCache {

    private static final Map<String, String> cache = new HashMap<>();

    public static LocalCache getCacheInstance(){
        return new LocalCache();
    }

    public void put(String key, String value){
        cache.put(key, value);
    }

    public String get(String key){
        if (StringUtils.isEmpty(key)){
            return "";
        }
        return cache.get(key);
    }
}
3、分布式缓存
4、缓存失效
缓存失效就是缓存没有命中
可能出现的问题:
- 缓存穿透
指查询一个不存在的数据,由于缓存不命中,就会去查询数据库,而数据库中也没有,我们也没有将这次查询的null写入缓存,这将导致这个不存在的数据每次都会查库,失去缓存的意义。
风险:利用不存在的数据进行攻击,数据库压力瞬间增大
解决:将null结果也写入缓存,并加入短暂过期时间。或者布隆过滤器,有误差
- 缓存雪崩
指在设置过期时间时设置了相同的,导致同一时间大量缓存失效,请求直接查库,db瞬间压力过大
解决:原有的失效时间加上一个随机值,这样每一个缓存过期时间重复率就会降低,就不会引发缓存集体失效
- 缓存击穿
对于一些设置了过期时间的key,如果这个key在大量请求进来前正好失效,那个所有的请求就会落到db,我们称之为缓存击穿
解决:加锁。大量并发只让一个请求去查,查完之后缓存中就会有数据了
5、锁时序问题
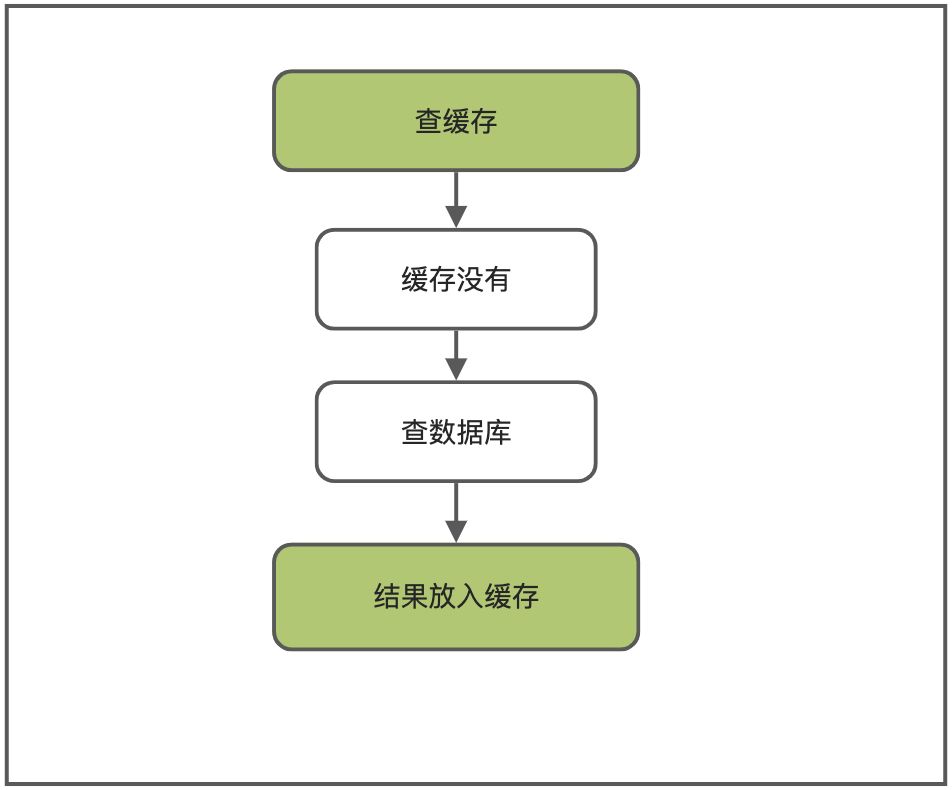
时序问题就是在线程1查询出结果,并且释放锁之后,将结果放入缓存之前,线程2获取到锁,又重新去查询了数据库,就会导致重复的数据库查询。流程大致如下: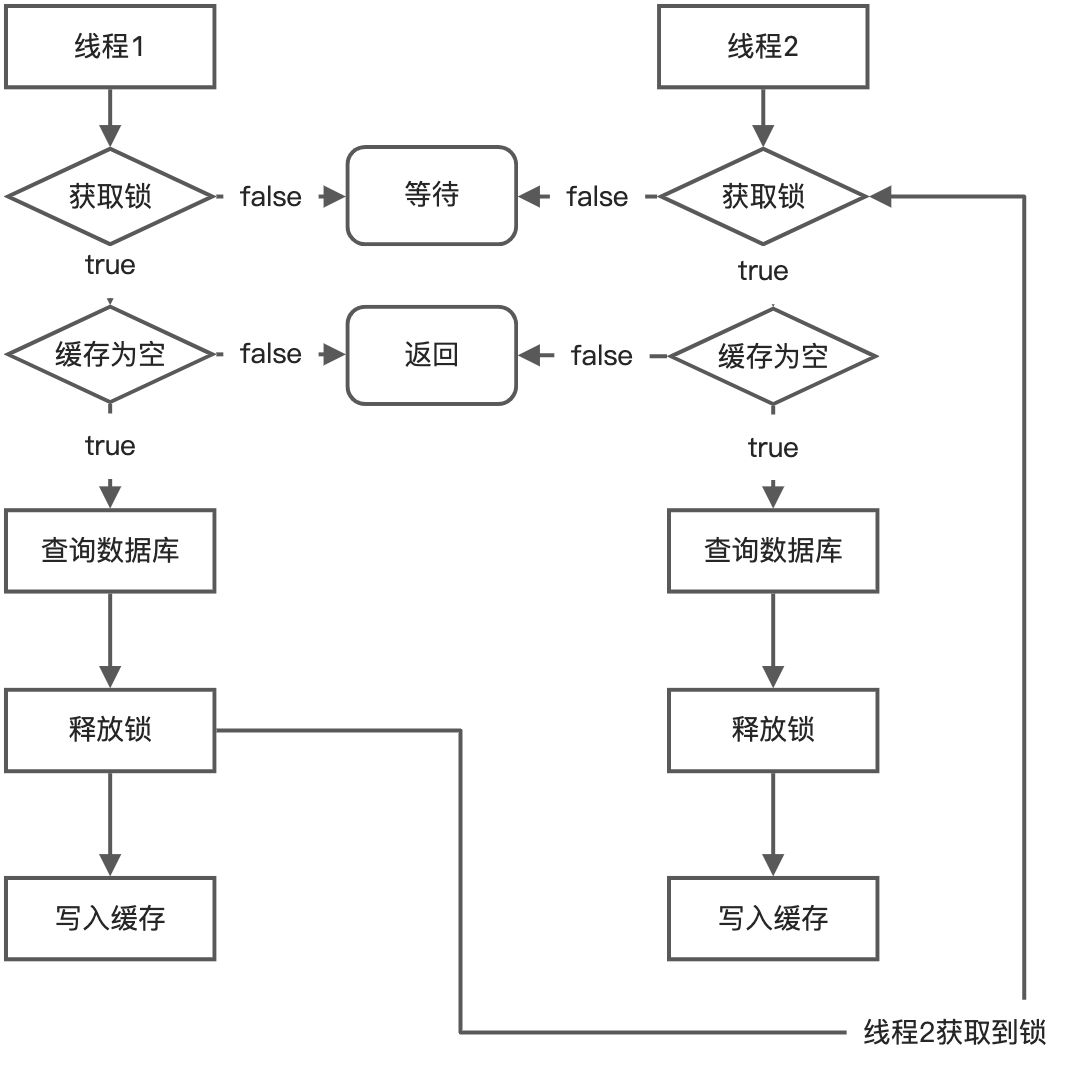
6、分布式锁
阶段一
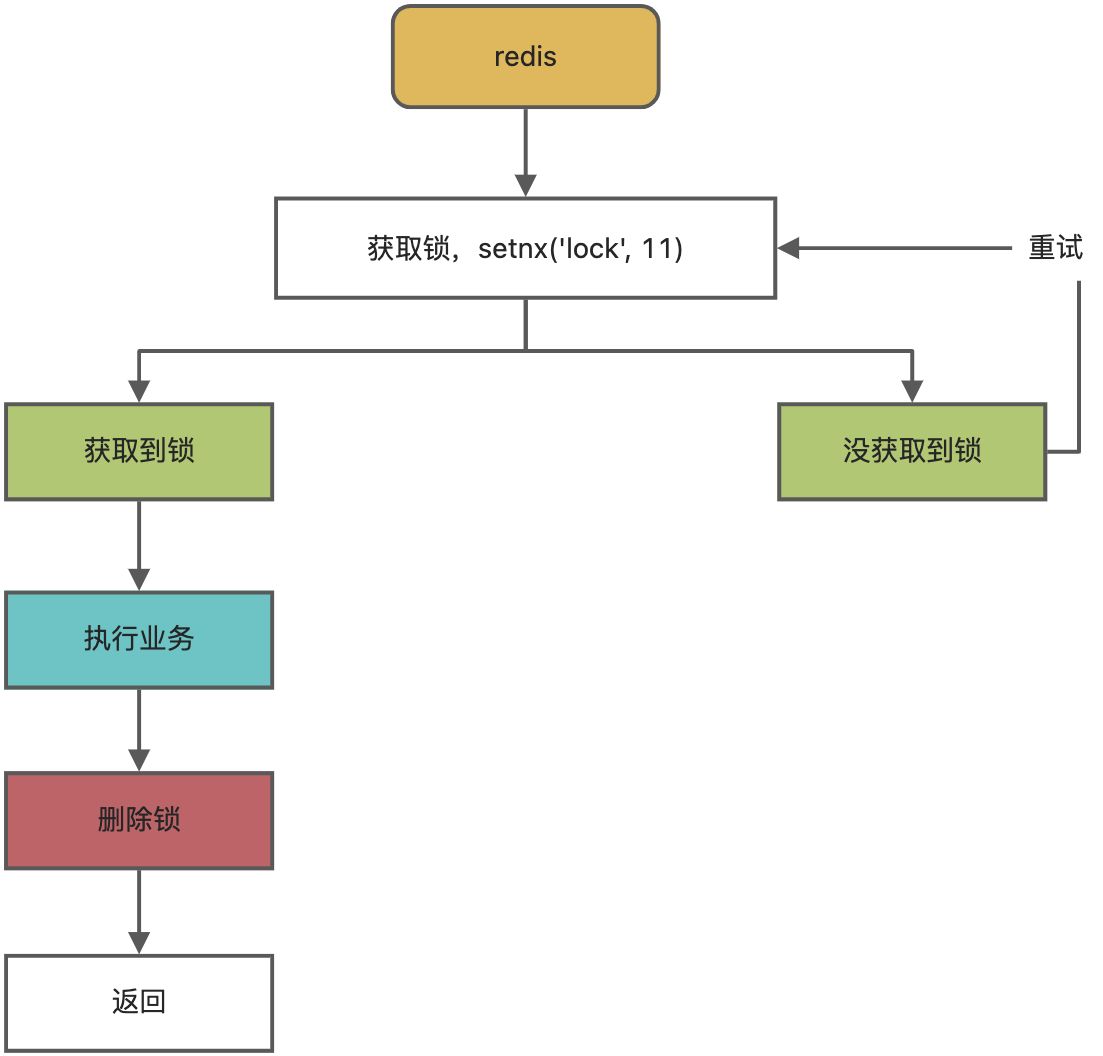
问题1、setnx获取到了锁,业务代码异常导致没有删除掉锁,就会造成死锁。
解决:设置锁的自动过期时间。
阶段二
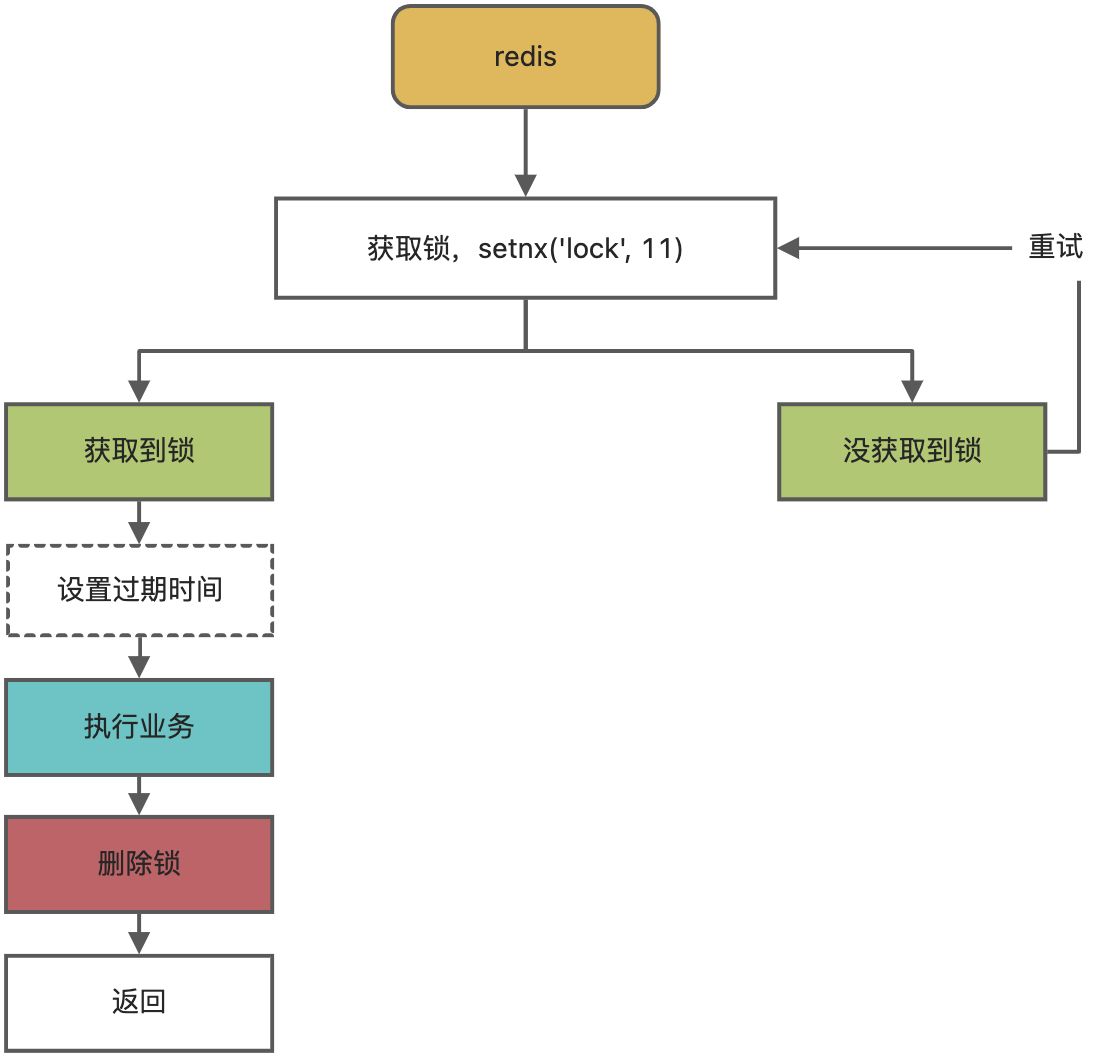
问题:setnx设置好了,准备设置过期时间,服务挂了,又死锁了。
解决:设置值和过期时间需要是原子操作。redis支持使用setnx ex命令。
setnx ex('', '', 10s)
阶段三
在删除锁的时候能直接删除嘛?
如果业务代码执行时间约等于锁过期时间,在业务代码执行结束的时候锁已经过期了,这时候删除的锁就是其他线程的锁了。
解决:占锁的时候,值指定为UUID,删除锁的时候匹配到自己的锁才删除。
阶段四
经过阶段三,还是有问题。
在删除锁的时候,先从redis获取下锁,redis也返回了,并且uuid也是当前线程的。但是当redis返回的同时,锁过期了,又重新被其他线程抢占了,这时候去执行删锁操作,删除的就还是其他线程的锁。
解决:删除锁的操作也必须保证原子性。redis提供了对应的方案:采用redis+lua脚本实现。
if redis.call("GET",KEYS[1]) == ARGV(1)
then
	return redis.call("del",KEYS[1])
else
	return 0
end
String script = "if redis.call(\"GET\",KEYS[1]) == ARGV(1)then 	return redis.call(\"del\",KEYS[1])else	return 0 end";
redisTemplate.execte(new DefaultRedisScript<Long>(script, Long.class),Arrays.asList("lock"),uuid);
7、Redisson
springboot整合redisson
        <!-- https://mvnrepository.com/artifact/org.redisson/redisson -->
        <dependency>
            <groupId>org.redisson</groupId>
            <artifactId>redisson</artifactId>
            <version>3.17.2</version>
        </dependency>
/**
 * @DESCRIPTION redisson作为分布式锁的配置
 * @Author yaya
 * @DATE 2022/5/28
 */
@Configuration
public class RedissonConfig {

    @Bean(name = "redisson")
    public RedissonClient getRedissonClient(){
        // 默认连接地址 127.0.0.1:6379
        Config config = new Config();
        config.useSingleServer().setAddress("redis://127.0.0.1:6379");
        config.useSingleServer().setPassword("redis");
        RedissonClient redisson = Redisson.create(config);
        return redisson;
    }
}
上面的配置只配了账号密码,具体的可以看官网。
redisson测试
/**
 * @DESCRIPTION redisson 锁测试
 * @Author yaya
 * @DATE 2022/5/28
 */
@SpringBootTest
public class RedissonLockTest {

    @Autowired
    public RedissonClient redisson;


    @Test
    public void testLock(){

        // 获取锁,只要名字相同,就是同一把锁
        RLock lock = redisson.getLock("lock");

        // 加锁
        lock.lock(); // 阻塞式等待

        try {
            System.out.println("加锁成功,执行业务操作..." + Thread.currentThread().getId());
            Thread.sleep(30000);
        } catch (Exception e) {
        } finally {
            // 解锁
            lock.unlock();
            System.out.println("解锁成功..." + Thread.currentThread().getId());
        }
    }
}
如果在执行业务操作的时候程序死掉了,也不会像之前一样死锁,而且在业务结束之前不会释放锁。这和redisson的看门狗机制有关。
看门狗
如果业务代码没执行完,锁却过期了,这时候其他线程又能抢锁了,线程不安全。所以Redisson内部有个看门狗的机制,意思是定时监测业务是否执行结束,没结束的话你这个锁是不是快到期了(超过锁的三分之一时间,比如设置的9s过期,现在还剩6s到期),那就重新续期。这样防止如果业务代码没执行完,锁却过期了所带来的线程不安全问题。
源码解读
基于上面的redisson测试代码,跟进源码瞅瞅。。
    private void lock(long leaseTime, TimeUnit unit, boolean interruptibly) throws InterruptedException {
        long threadId = Thread.currentThread().getId();
        Long ttl = this.tryAcquire(-1L, leaseTime, unit, threadId); // 这一行
        if (ttl != null) {
            CompletableFuture<RedissonLockEntry> future = this.subscribe(threadId);
            this.pubSub.timeout(future);
            RedissonLockEntry entry;
            if (interruptibly) {
                entry = (RedissonLockEntry)this.commandExecutor.getInterrupted(future);
            } else {
                entry = (RedissonLockEntry)this.commandExecutor.get(future);
            }

            try {
                while(true) {
                    ttl = this.tryAcquire(-1L, leaseTime, unit, threadId);
                    if (ttl == null) {
                        return;
                    }

                    if (ttl >= 0L) {
                        try {
                            entry.getLatch().tryAcquire(ttl, TimeUnit.MILLISECONDS);
                        } catch (InterruptedException var14) {
                            if (interruptibly) {
                                throw var14;
                            }

                            entry.getLatch().tryAcquire(ttl, TimeUnit.MILLISECONDS);
                        }
                    } else if (interruptibly) {
                        entry.getLatch().acquire();
                    } else {
                        entry.getLatch().acquireUninterruptibly();
                    }
                }
            } finally {
                this.unsubscribe(entry, threadId);
            }
        }
    }
主要在这一行this.tryAcquire(-1L, leaseTime, unit, threadId);
    private <T> RFuture<Long> tryAcquireAsync(long waitTime, long leaseTime, TimeUnit unit, long threadId) {
        RFuture ttlRemainingFuture;
        if (leaseTime > 0L) {
            ttlRemainingFuture = this.tryLockInnerAsync(waitTime, leaseTime, unit, threadId, RedisCommands.EVAL_LONG);
        } else {
            ttlRemainingFuture = this.tryLockInnerAsync(waitTime, this.internalLockLeaseTime, TimeUnit.MILLISECONDS, threadId, RedisCommands.EVAL_LONG);// 就会进这个方法,并且指定过期时间this.internalLockLeaseTime【这个时间就是看门狗的默认时间】
        }

        CompletionStage<Long> f = ttlRemainingFuture.thenApply((ttlRemaining) -> {
            if (ttlRemaining == null) {
                if (leaseTime > 0L) {
                    this.internalLockLeaseTime = unit.toMillis(leaseTime);
                } else {
					// 如果没指定过期时间,执行这个
                    this.scheduleExpirationRenewal(threadId);
                }
            }

            return ttlRemaining;
        });
        return new CompletableFutureWrapper(f);
    }
因为没有制定过期时间,所以leaseTime就是-1L。就会进else分支,在else分支中调用的方法会将看门狗的默认时间this.internalLockLeaseTime作为过期时间传递进去。
this.tryLockInnerAsync(waitTime, this.internalLockLeaseTime, TimeUnit.MILLISECONDS, threadId, RedisCommands.EVAL_LONG)
最终会调到这个方法,会真正的去加锁
    protected <T> RFuture<T> evalWriteAsync(String key, Codec codec, RedisCommand<T> evalCommandType, String script, List<Object> keys, Object... params) {
        MasterSlaveEntry entry = this.commandExecutor.getConnectionManager().getEntry(this.getRawName());
        int availableSlaves = entry.getAvailableSlaves();
        CommandBatchService executorService = this.createCommandBatchService(availableSlaves);
        RFuture<T> result = executorService.evalWriteAsync(key, codec, evalCommandType, script, keys, params);
        if (this.commandExecutor instanceof CommandBatchService) {
            return result;
        } else {
            RFuture<BatchResult<?>> future = executorService.executeAsync();
            CompletionStage<T> f = future.handle((res, ex) -> {
                if (ex != null) {
                    throw new CompletionException(ex);
                } else if (this.commandExecutor.getConnectionManager().getCfg().isCheckLockSyncedSlaves() && res.getSyncedSlaves() < availableSlaves) {
                    throw new CompletionException(new IllegalStateException("Only " + res.getSyncedSlaves() + " of " + availableSlaves + " slaves were synced"));
                } else {
                    return this.commandExecutor.getNow(result.toCompletableFuture());
                }
            });
            return new CompletableFutureWrapper(f);
        }
    }
当加锁完成后又会返回到tryAcquireAsync中。由于没有制定过期时间,会执行this.scheduleExpirationRenewal(threadId);方法,点进去
    protected void scheduleExpirationRenewal(long threadId) {
        RedissonBaseLock.ExpirationEntry entry = new RedissonBaseLock.ExpirationEntry();
        RedissonBaseLock.ExpirationEntry oldEntry = (RedissonBaseLock.ExpirationEntry)EXPIRATION_RENEWAL_MAP.putIfAbsent(this.getEntryName(), entry);
        if (oldEntry != null) {
            oldEntry.addThreadId(threadId);
        } else {
            entry.addThreadId(threadId);

            try {
                this.renewExpiration();// 点进去
            } finally {
                if (Thread.currentThread().isInterrupted()) {
                    this.cancelExpirationRenewal(threadId);
                }

            }
        }

    }
this.renewExpiration()
    private void renewExpiration() {
        RedissonBaseLock.ExpirationEntry ee = (RedissonBaseLock.ExpirationEntry)EXPIRATION_RENEWAL_MAP.get(this.getEntryName());
        if (ee != null) {
            Timeout task = this.commandExecutor.getConnectionManager().newTimeout(new TimerTask() {
                public void run(Timeout timeout) throws Exception {
                    RedissonBaseLock.ExpirationEntry ent = (RedissonBaseLock.ExpirationEntry)RedissonBaseLock.EXPIRATION_RENEWAL_MAP.get(RedissonBaseLock.this.getEntryName());
                    if (ent != null) {
                        Long threadId = ent.getFirstThreadId();
                        if (threadId != null) {
                            CompletionStage<Boolean> future = RedissonBaseLock.this.renewExpirationAsync(threadId);
                            future.whenComplete((res, e) -> {
                                if (e != null) {
                                    RedissonBaseLock.log.error("Can't update lock " + RedissonBaseLock.this.getRawName() + " expiration", e);
                                    RedissonBaseLock.EXPIRATION_RENEWAL_MAP.remove(RedissonBaseLock.this.getEntryName());
                                } else {
                                    if (res) {
                                        RedissonBaseLock.this.renewExpiration();
                                    } else {
                                        RedissonBaseLock.this.cancelExpirationRenewal((Long)null);
                                    }

                                }
                            });
                        }
                    }
                }
            }, this.internalLockLeaseTime / 3L, TimeUnit.MILLISECONDS);
            ee.setTimeout(task);
        }
    }
这里面启动了一个TimerTask,延迟this.internalLockLeaseTime / 3L,也就是看门狗的三分之一默认时间执行一次,执行完了又会调自己。
总结
redisson对加锁的支持有两种。第一种是指定过期时间,会直接将指定的时间作为过期时间;第二种方式是不指定过期时间,默认会用看门狗的默认过期时间【30秒】,并且在占到锁的时候,会启动一个定时任务【看门狗】,这个定时任务的延迟时间是看门狗默认时间的三分之一,这个定时任务的作用是给锁重新设置过期时间,并且会调自己,也就是三分之一时间会执行一次,保证在业务执行过程中锁是一直持有的。
==但在实践中还是推荐指定过期时间,手动解锁的操作==
redisson读写锁
@Test
    public void testReadWriteLock(){


        Thread thread1 = new Thread(new TimerTask() {
            @Override
            public void run() {
                RReadWriteLock rlock = redisson.getReadWriteLock("rw-lock");
                RLock lock = rlock.readLock();
                try {
                    System.out.println("读操作进行中...");
                    Thread.sleep(10000);
                }catch (Exception e){
                    e.printStackTrace();
                }finally {
                    lock.unlock();
                }
            }
        });
        Thread thread2 = new Thread(new TimerTask() {
            @Override
            public void run() {
                RReadWriteLock rlock = redisson.getReadWriteLock("rw-lock");
                RLock lock = rlock.readLock();
                try {
                    System.out.println("写操作进行中...");
                    Thread.sleep(10000);
                }catch (Exception e){
                    e.printStackTrace();
                }finally {
                    lock.unlock();
                }
            }
        });

        thread1.start();
        thread2.start();

    }
写锁是一个排他锁【互斥锁】;读锁是一个共享锁。
- 写 + 读:等待写锁释放
- 写 + 写:阻塞方式
- 读 + 写:等待读锁释放
- 读 + 读:不会阻塞
信号量
    // 信号量

    /**
     * 相当于停车位 【redis中添加一个key Semaphore,值是数量10个停车位】
     *  tryAcquire 表示获取一个停车位,获取不到就返回false
     *  release 表示释放一个停车位
     * 应用:
     *  限流:设置10000个,每个请求都去获取一个信号量,超出的就会返回false
     * @throws InterruptedException
     */
    @Test
    public void testSemaphore() throws InterruptedException {

        RSemaphore lock = redisson.getSemaphore("Semaphore");

        lock.acquire(); // 阻塞式等待获取信号量
        boolean b = lock.tryAcquire(); // 非阻塞获取信号量,会返回获取成功/失败

        // 获取同一把锁调用释放方法
        lock.release(); // 释放一个信号量
    }
闭锁
    // 闭锁
    @Test
    public void testCountDownLatch() throws InterruptedException {
        RCountDownLatch countdown = redisson.getCountDownLatch("countdown");
        countdown.trySetCount(10);
        countdown.await(); // 阻塞式等待 10 个完成, 当设置的10减为0时阻塞取消
//        countdown.await(10, TimeUnit.SECONDS); //

        // todo 获取同一把锁
        countdown.countDown(); // 完成一个 count -1
    }
8、缓存数据一致性
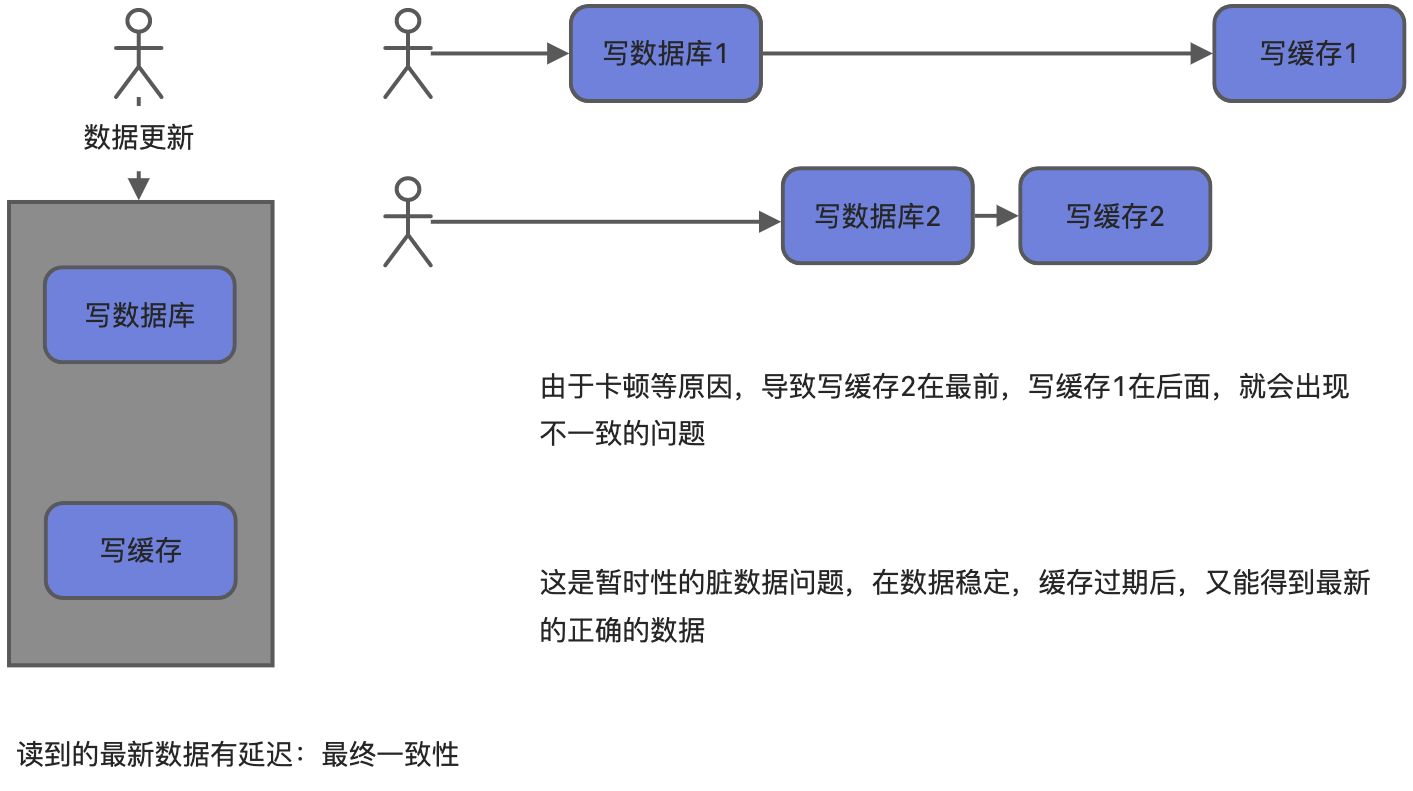
双写模式
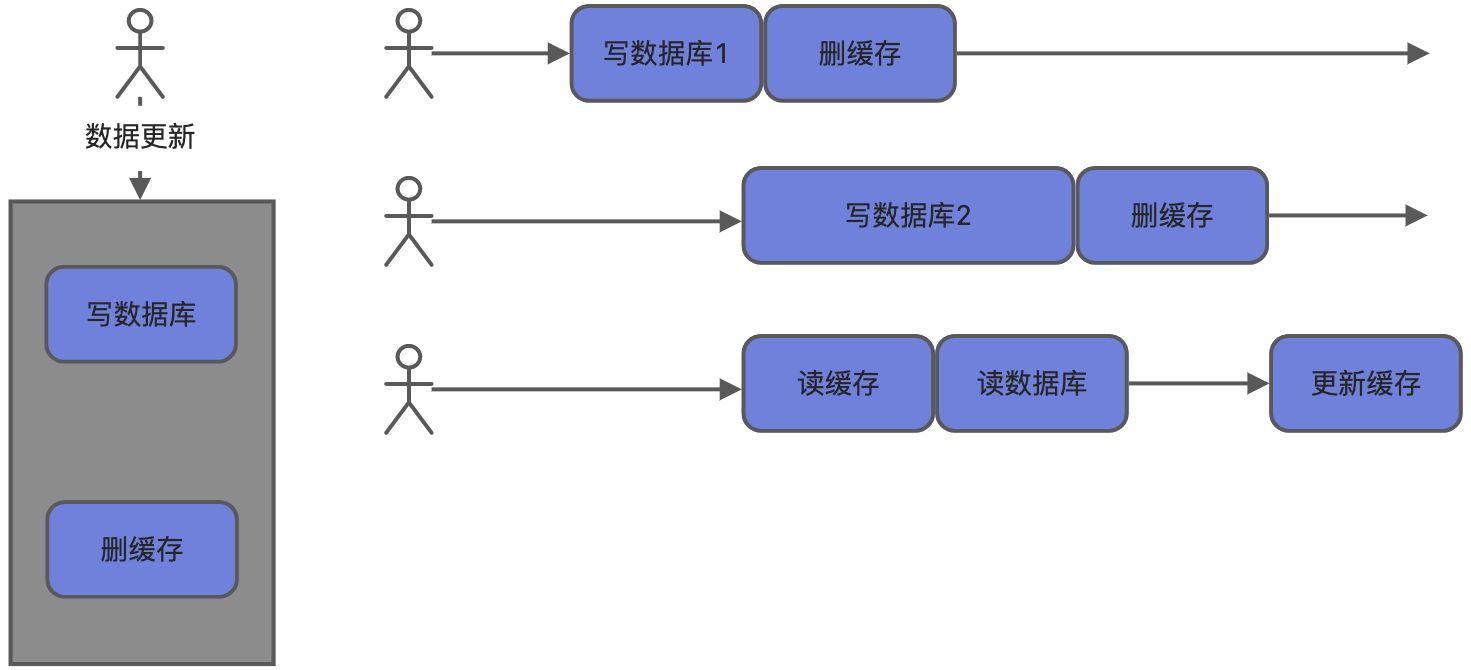
失效模式
9、缓存一致性解决方案
无论是双写模式还是失效模式,都会导致缓存的不一致问题,即多个同时更新会有问题。
1、如果是用户纬度数据(订单数据、用户数据),这种并发几率较小,不用考虑这个问题,缓存数据加上过期时间,每个一段时间自动更新数据即可。
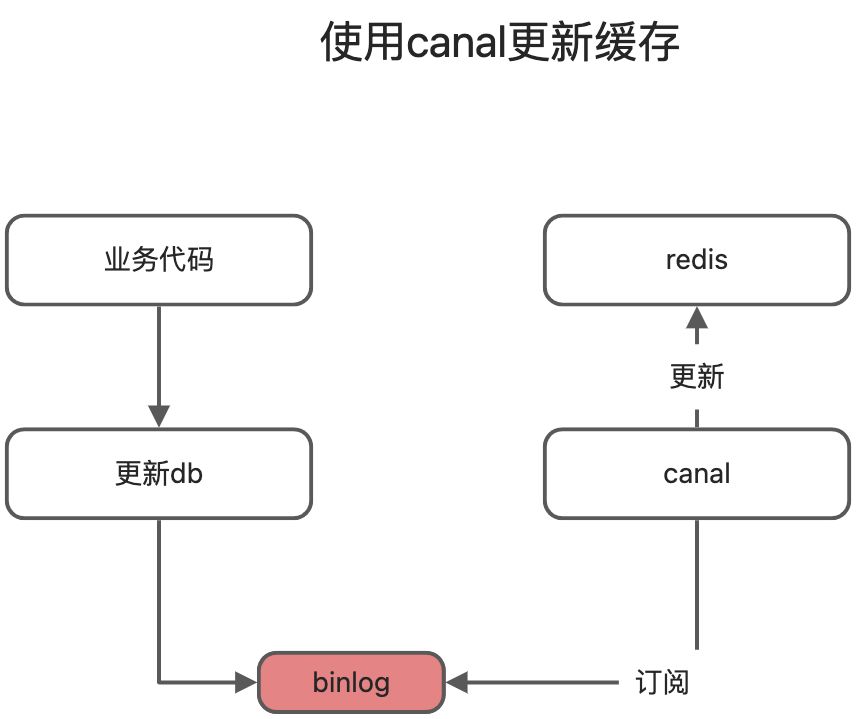
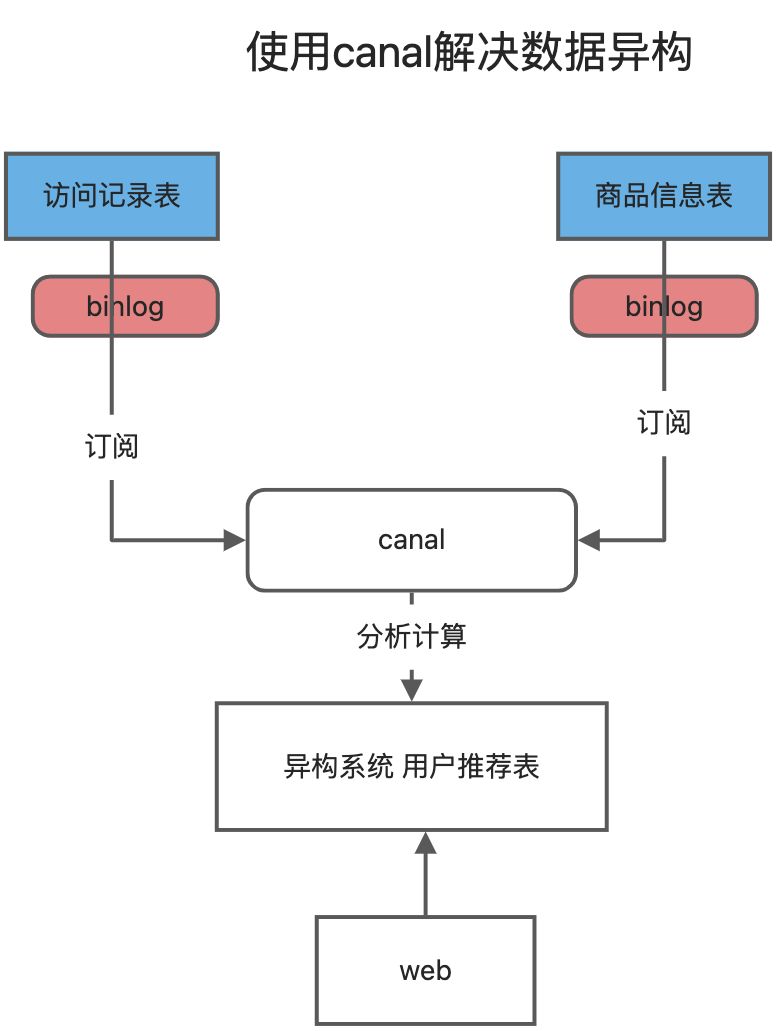
2、如果是菜单、商品介绍等基础数据,也可以使用canal订阅binlog的方式
3、缓存数据 + 过期时间也足够解决大部分业务对于缓存的要求
4、通过加锁保证并发读写,写写的时候按顺序排好队,读读无所谓。所以适合使用读写锁
总结:
canal
10、SpringCache
springcache使用
整合springcache简化缓存开发。
需要引入cache和redis【获取其他缓存中间件】和依赖。
@Configuration
@ConfigurationProperties(prefix = "spring.myredis")
public class MyRedisConfig {

    Logger logger = LoggerFactory.getLogger(MyRedisConfig.class);

    // 自定义缓存组件
    @Bean
    public RedisTemplate<Object, Object> redisTemplate(RedisConnectionFactory redisConnectionFactory) {
        RedisTemplate<Object, Object> template = new RedisTemplate();
        template.setConnectionFactory(redisConnectionFactory);
        Jackson2JsonRedisSerializer serializer = new Jackson2JsonRedisSerializer<>(Object.class);
        template.setDefaultSerializer(serializer);
        logger.error("redisTemplates成功创建.................");
        return template;
    }

    private Duration timeToLive = Duration.ofMillis(30);
    public void setTimeToLive(int timeToLive) {
        logger.error("ttl 成功赋值.................");
        this.timeToLive = Duration.ofMillis(timeToLive);
    }

    @Bean(name = "myrediscachemanager")
    public CacheManager cacheManager(RedisConnectionFactory redisConnectionFactory) {
        //初始化一个RedisCacheWriter
        RedisCacheWriter redisCacheWriter = RedisCacheWriter.nonLockingRedisCacheWriter(redisConnectionFactory);
        //设置CacheManager的值序列化方式为json序列化
        RedisSerializer<Object> jsonSerializer = new GenericJackson2JsonRedisSerializer();
        RedisSerializationContext.SerializationPair<Object> pair = RedisSerializationContext.SerializationPair
                .fromSerializer(jsonSerializer);
        RedisCacheConfiguration defaultCacheConfig=RedisCacheConfiguration.defaultCacheConfig()
                .serializeValuesWith(pair);
        //设置默认超过期时间是30秒
        defaultCacheConfig.entryTtl(timeToLive);
        //初始化RedisCacheManager
        logger.error("cachemanager成功..............");
        return new RedisCacheManager(redisCacheWriter, defaultCacheConfig);
    }

}
自定义key生成策略【也可以使用默认的主键生成策略,但不建议】:
@Configuration
public class CacheKeyGenerator {

    @Bean("myKeyGenerator")
    public KeyGenerator keyGenerator(){
        return new KeyGenerator(){
            @Override
            public Object generate(Object o, Method method, Object... objects) {
                System.out.println("开始自定义key的生成策略。。。。。。。。。。。");
                return method.getName()+"["+ Arrays.asList(objects).toString() +"]";
            }
        };
    }

}
配置文件
	spring.cache.redis.use-key-prefix=true
## Redis\u6570\u636E\u5E93\u7D22\u5F15\uFF08\u9ED8\u8BA4\u4E3A0\uFF09
spring.redis.database=0
## Redis\u670D\u52A1\u5668\u5730\u5740
spring.redis.host=127.0.0.1
## Redis\u670D\u52A1\u5668\u8FDE\u63A5\u7AEF\u53E3
spring.redis.port=6379
## Redis\u670D\u52A1\u5668\u8FDE\u63A5\u5BC6\u7801\uFF08\u9ED8\u8BA4\u4E3A\u7A7A\uFF09
spring.redis.password=
## \u8FDE\u63A5\u6C60\u6700\u5927\u8FDE\u63A5\u6570\uFF08\u4F7F\u7528\u8D1F\u503C\u8868\u793A\u6CA1\u6709\u9650\u5236\uFF09
spring.redis.jedis.pool.max-active=8
## \u8FDE\u63A5\u6C60\u6700\u5927\u963B\u585E\u7B49\u5F85\u65F6\u95F4\uFF08\u4F7F\u7528\u8D1F\u503C\u8868\u793A\u6CA1\u6709\u9650\u5236\uFF09
spring.redis.jedis.pool.max-wait=-1
## \u8FDE\u63A5\u6C60\u4E2D\u7684\u6700\u5927\u7A7A\u95F2\u8FDE\u63A5
spring.redis.jedis.pool.max-idle=8
## \u8FDE\u63A5\u6C60\u4E2D\u7684\u6700\u5C0F\u7A7A\u95F2\u8FDE\u63A5
spring.redis.jedis.pool.min-idle=0
## \u8FDE\u63A5\u8D85\u65F6\u65F6\u95F4\uFF08\u6BEB\u79D2\uFF09
spring.redis.timeout=1200
spring.cache.redis.time-to-live=60
spring.cache.redis.cache-null-values=true
缓存注解的使用
@CacheConfig(cacheNames = {"employee"}, cacheManager ="myrediscachemanager")   // 抽取缓存注解的公共配置
@Service
public class EmployeeService {

    @Autowired
    EmployeeRepository employeeRepository;

    @Cacheable(cacheNames = {"employee"},unless = "#result == null", keyGenerator = "myKeyGenerator")  // 将方法的结果缓存起来
    public List<Employee> findAll(){
        return employeeRepository.findAll();
    }

    /**
     * Cacheable
     *  cacheNames: 缓存组件,相当于保存缓存数据的那个map的名字
     *  key:缓存数据使用的key,可以使用spel表达式
     *  keyGenerator:key的生成器
     *  cacheManager:缓存管理器
     *  cacheResoler:缓存解析器
     *  condition:符合条件的情况下才缓存eg:#id>0
     *  unless:当条件为false时才会缓存
     *  sync:是否使用异步模式
     *  , keyGenerator = "myKeyGenerator"
     *  ,unless = "#result == null"
     * @param id
     * @return
     */
    @Cacheable(/*value = {"employee"}, */key = "#id")  // 将方法的结果缓存起来
    public Employee getOne(int id){
        return employeeRepository.getOne(id);
    }

    public Employee getById(int id){
        return employeeRepository.getById(id);
    }

    public Employee insert(Employee employee){
        return employeeRepository.save(employee);
    }


    /**
     * CachePut:调用方法,同时更新缓存【双写模式】
     * 目标方法调用完成之后将方法结果缓存起来
     */

    @CachePut(/*value = {"employee"}, */key = "#employee.id")
    public Employee update (Employee employee){
        employeeRepository.updateEmp(employee);
        System.out.println("员工信息更新完成。。。。。");
        return employee;
    }


    /**
     * CacheEvict:缓存清除,删除后将缓存清除掉【失效模式】
     * allEntries = false ,是否删除所有缓存
     * ,beforeInvocation = false,是否是在方法之前执行
     */
    @CacheEvict(/*cacheNames = {"employee"}, */key = "#id")
    public void del(int id){
//        employeeRepository.deleteById(id);
        System.out.println("员工已删除............");
    }


    /**
     * @Caching:复杂的缓存规则
     */

    @Caching(
            cacheable = {
                    @Cacheable(key = "#name")  // name作为key,方法返回值作为value进行缓存
            },
            put = {
                    @CachePut(key = "#result.id"),
                    @CachePut(key = "#result.email")
            }
    )
    public Employee getEmpByName(String name){
        return employeeRepository.findEmpByName(name);
    }


}
springcache的不足
1、读模式
- 缓存穿透:查询null数据。解决:缓存空数据:cache-null-values=true
- 缓存击穿:大量请求查询一个正好过期的key。@Cacheable(sync=true)
- 缓存雪崩:大量key同时过期。加上过期时间:spring.cache.redis.time-to-live=10
2、写模式
- 读写加锁
- 引入canal,订阅binlog
- 读多写少,直接查询数据库
总结:springcache解决了读模式下的三个问题,写模式没有处理。但读多写少的数据完全可以使用springcache。
